Instruct "How to Smooth Skin with Advanced Detail in Photoshop” will help you make your skin smooth and perfect. By using the tool Spot Healing Brush to remove blemishes and the Blur tool to add smoothness, you will create photos with radiant and natural skin. Explore this tutorial and experience this amazing technique in Photoshop!
Video tutorial available Details at the end of the article.
Advanced Skin Smoothing in Photoshop
Step 1: Duplicate 3 more layers from the original layer
From "background layer"You duplicate 3 new layers and name each layer. The order of the layers is as follows.
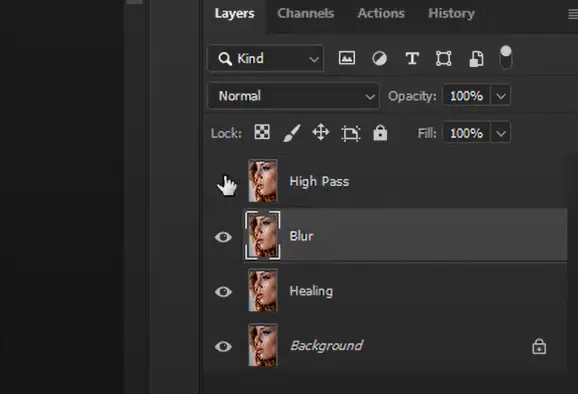
Layer 1: Background This is the default layer. Layer 2: set as Healing, Layer 3: Blur, Layer 4: High Pass as shown above
Step 2: Turn off the High Pass layer to process the Blur layer
To make it easier to see when we process Layer Blur we will turn off high pass
Step 3: Create Gaussian Blur effect
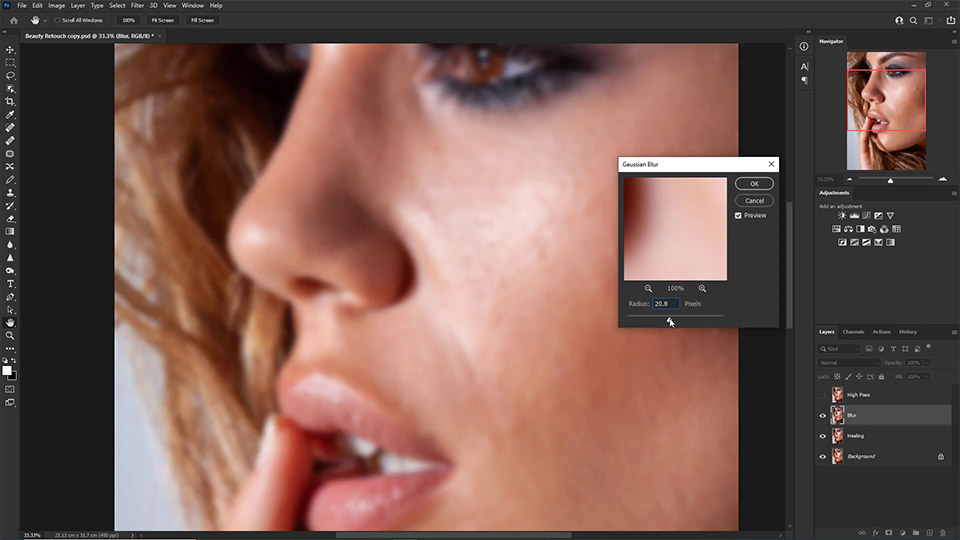
From layer “Blur"You give it an effect Gaussian Blur by entering Filter > Blur > Gaussian Blur Then set the parameters as shown so that the image's opacity is enough to smooth your skin at the best level. In this image, I choose 18 – 20 Px
Step 4: Process the High Pass layer
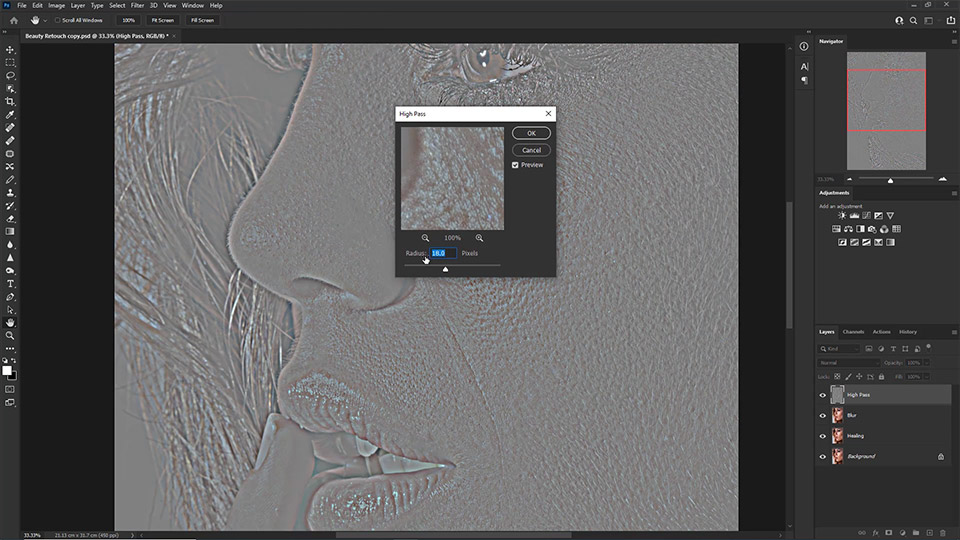
Here we turn on the layer High Pass up we will assign it an effect as follows: Menu > Filter > Other > High Pass. You choose the parameters so that the detailed lines on the face are clearest. You can refer to the parameters as in the picture (I am choosing 16-18)
Step 5: Select Blending mode for layer hight pass
After selecting ok in step 4, we need to select an effect for it to only get the lines to make the photo clearer and more detailed.
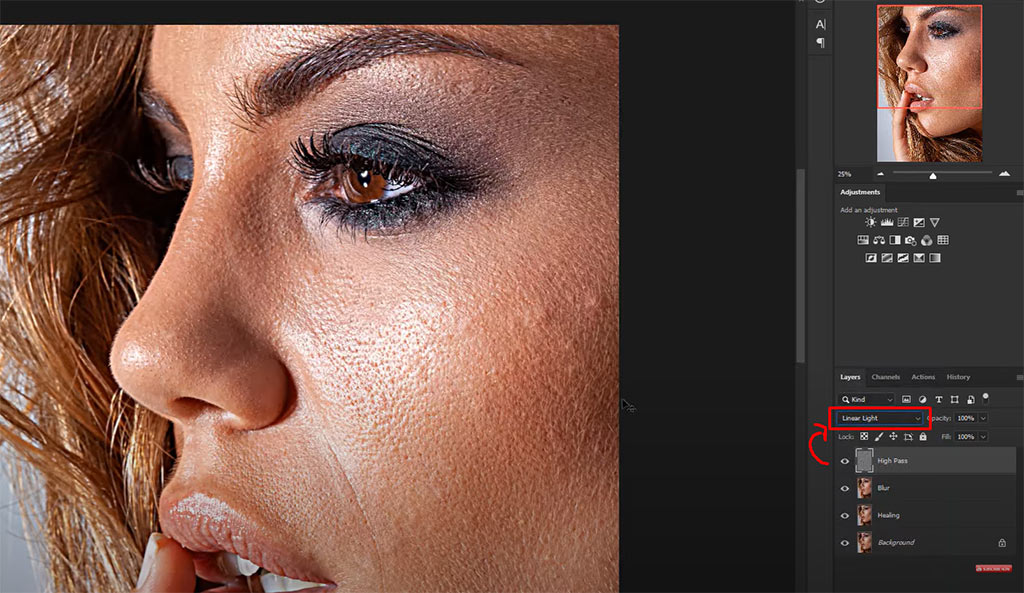
After using blending we will see very clear and detailed lines. We will need to reduce this detail by reducing the contrast along the path. Menu > Image > Adjustments > Brightness/Contrast … increase the parameters as shown below
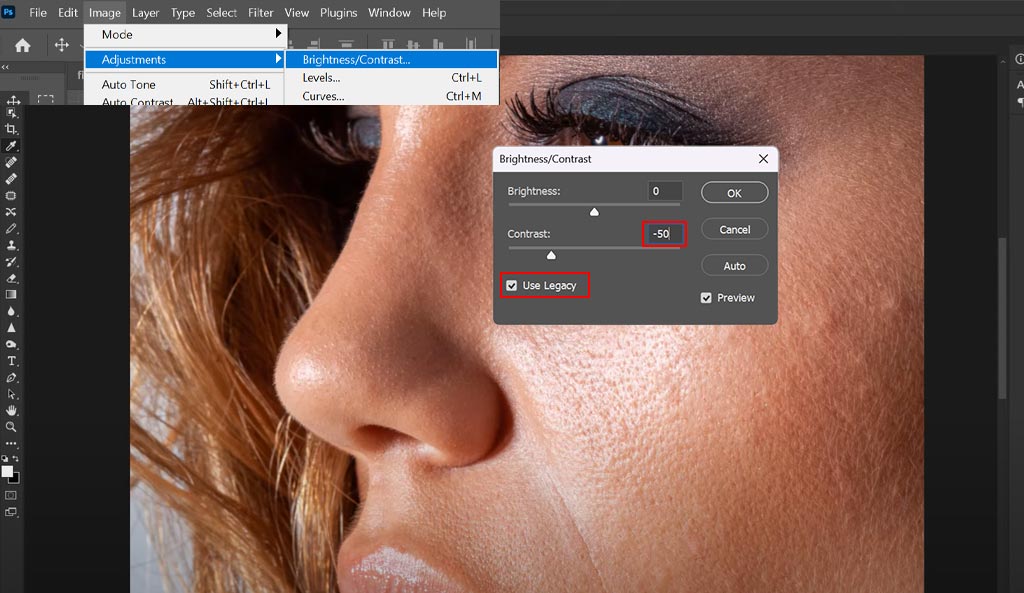
When leaving the parameter -50 may not be suitable for your image, you can adjust it to best suit your image.
Step 6: Treat stains on the surface Clone Stamp tool
When you edit, nothing has changed. This step will help your image lose the marks. Now you will use the tool Clone Stamp "S" This tool is used to take from an ok position and pour it into the faulty position. To use this tool: Press the letter S on the keyboard (this is the shortcut) > you hold the key Alt suction position no error > release keys Alt > left click into the error area to fix it.
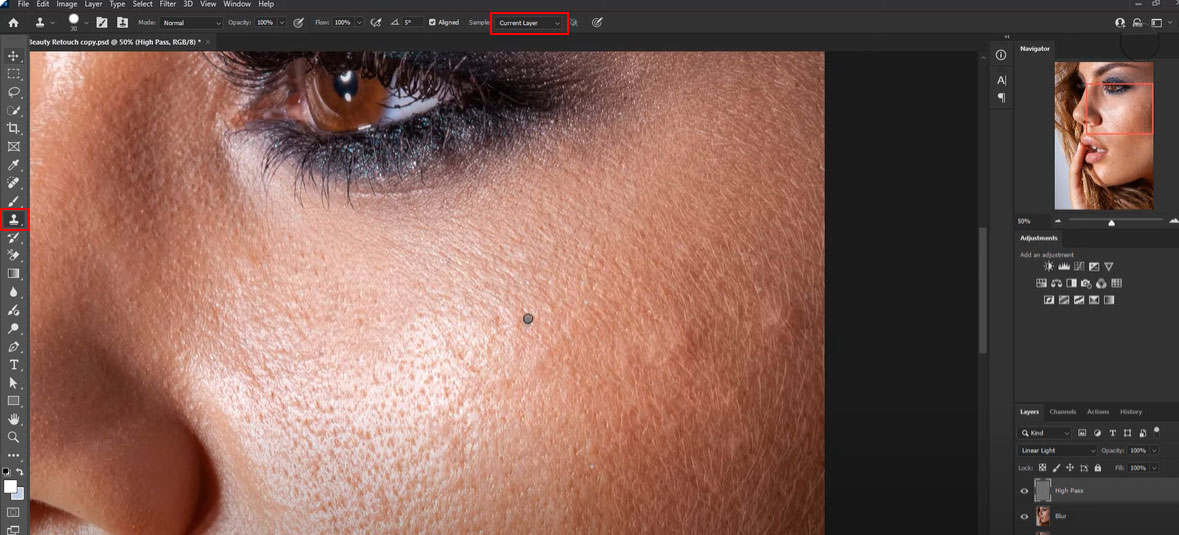
Step 7: Create a layer to increase light and dark for easier adjustment
Create a new layer in Monochrome style to create the right black and white light, they will show the error area and make it easier to fix.
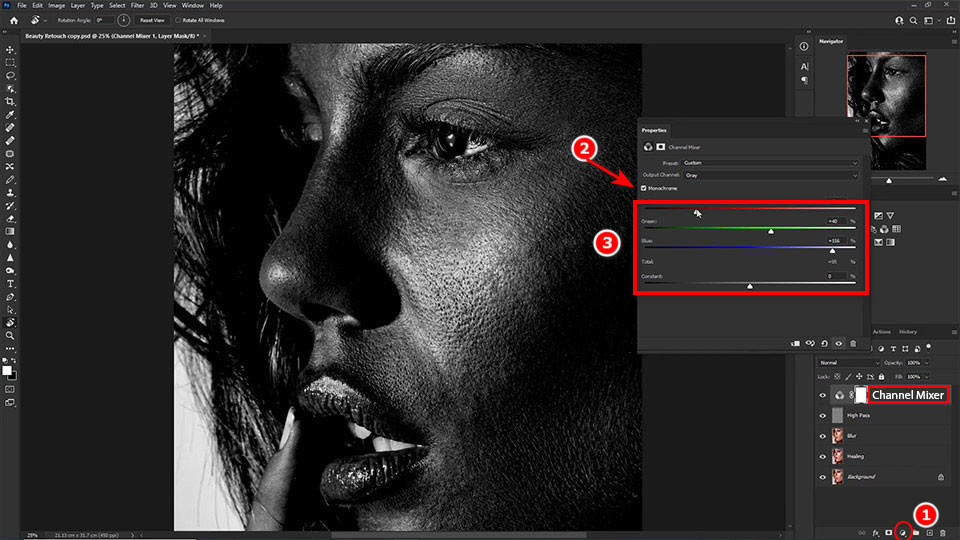
Note: After you're done, turn off the layer. Changnel Mixer let's go
Step 8: Use Mixer Brush to even out skin tone
After completing step 7 you turn off layer High Pass continue layer Blur. You use tools Brush (B) right click on the tool select the last one is Mixer Brush
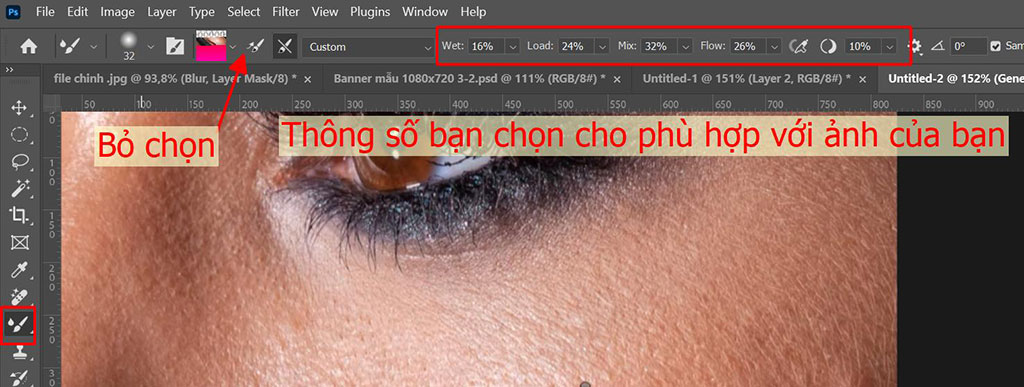
Next, select the area where the error occurs and rub it evenly over that area of skin.
Step 9: Group the 3 layers created initially into 1 group
To keep the group Ctrl select each layer > press Ctrl + G > rename group into Pick pimples > Press Ctrl + Ship + Alt + E It will create a new layer, this layer will combine all the operations we did before into a new layer.
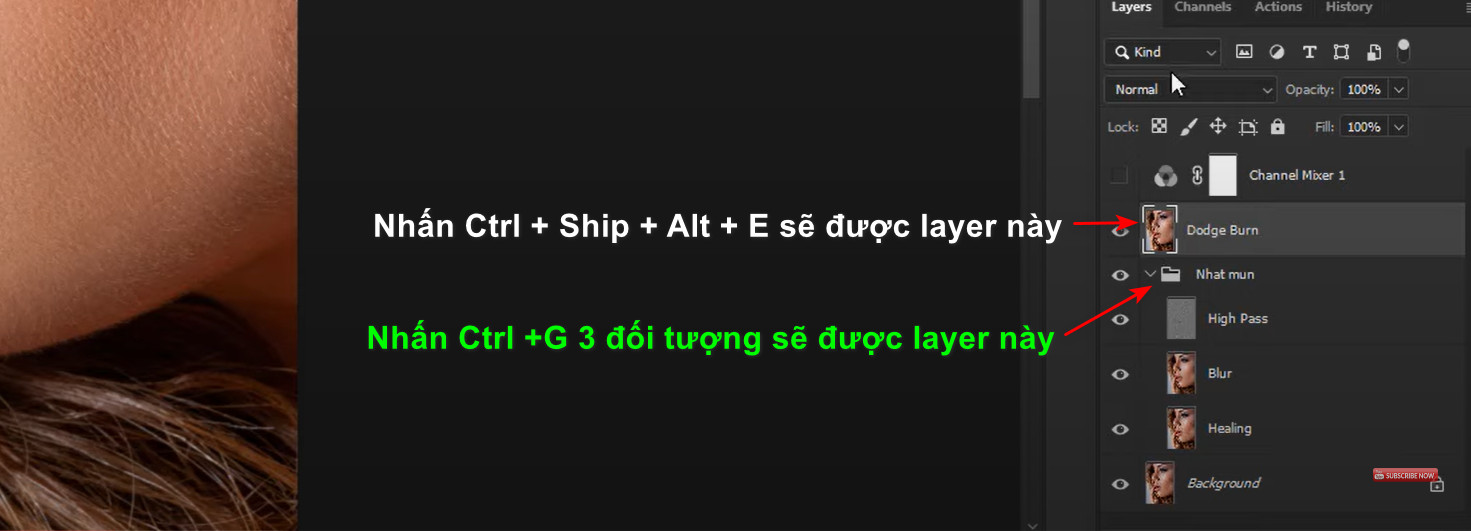
Step 10: Increase the brightness and darkness of the photo.
To increase light and dark you create 2 layers 1 light layer and 1 dark layer. Light layer we will pull up the light a little. Dark layer we will darken down a bit
Create a group of 3 objects and rename > duplicate and merge into 1 shape then rename to Dodge Burn
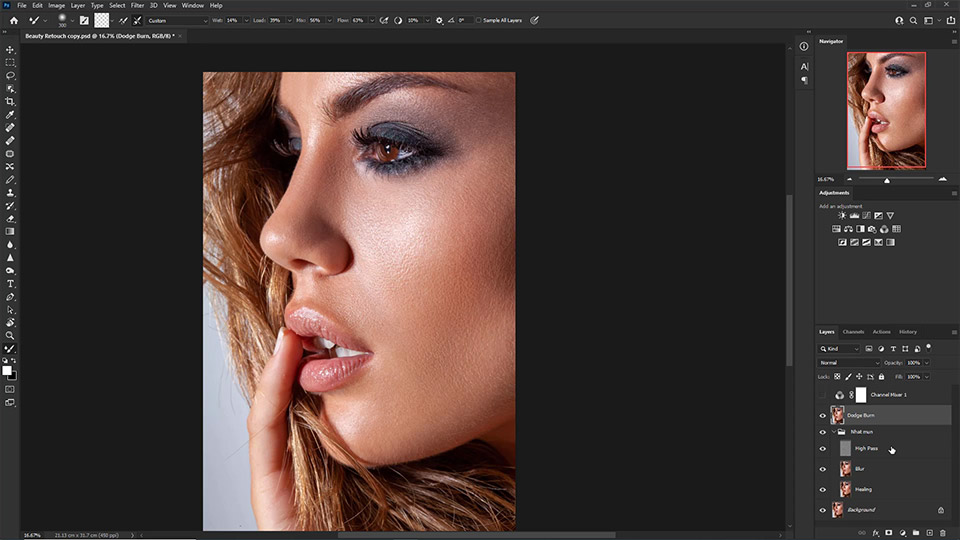
Step 9: Create 2 Curves lighting effects and rename them Dodge and Burn (Dodge adjusts brightness and Burn adjusts darkness)
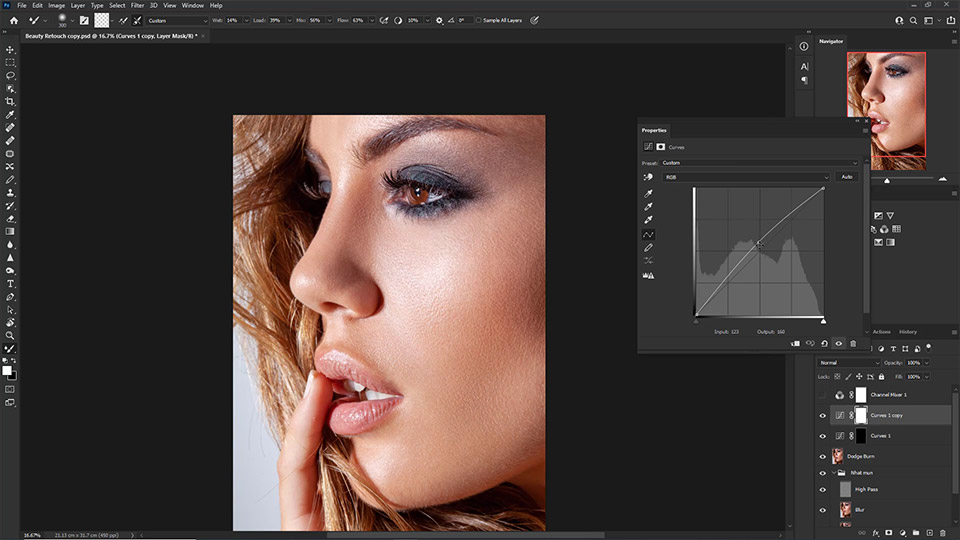
Step 10: Select the Dodge object and use Brush with Opacity 5% – 10% to brighten the facial skin a little.
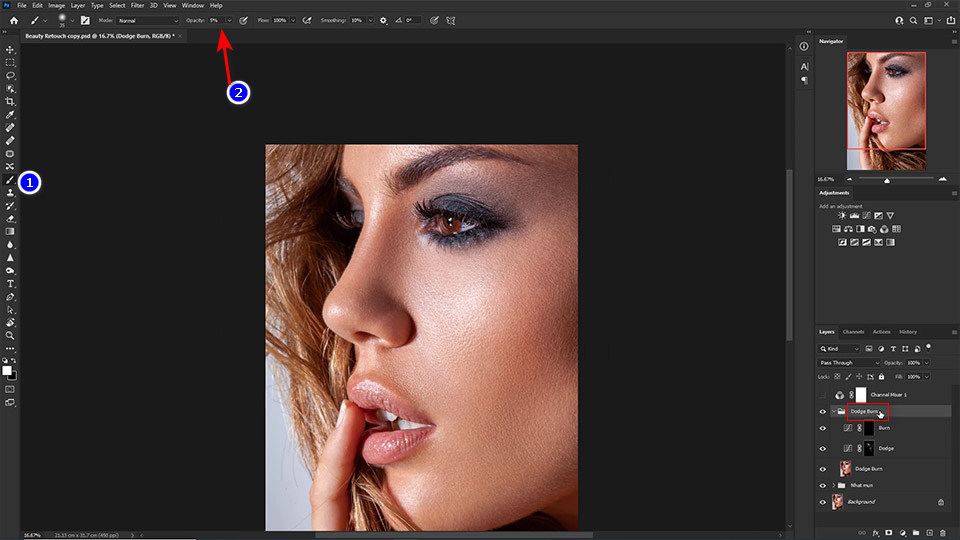
Using Brush (B) and reduce the Opacity from 5% – 10% to make the skin smoother in the Dodge layer.
Step 11: Create a group of 3 next objects and rename it Dodge Burn -> similar to step 10 and rename it Finish
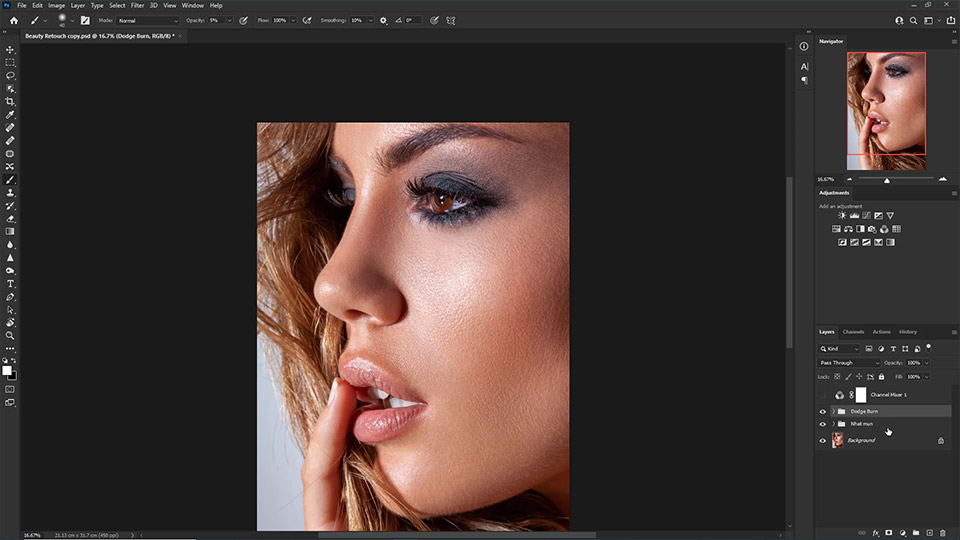
Create a group of the next 3 objects and then rename them to Dodge Burn.
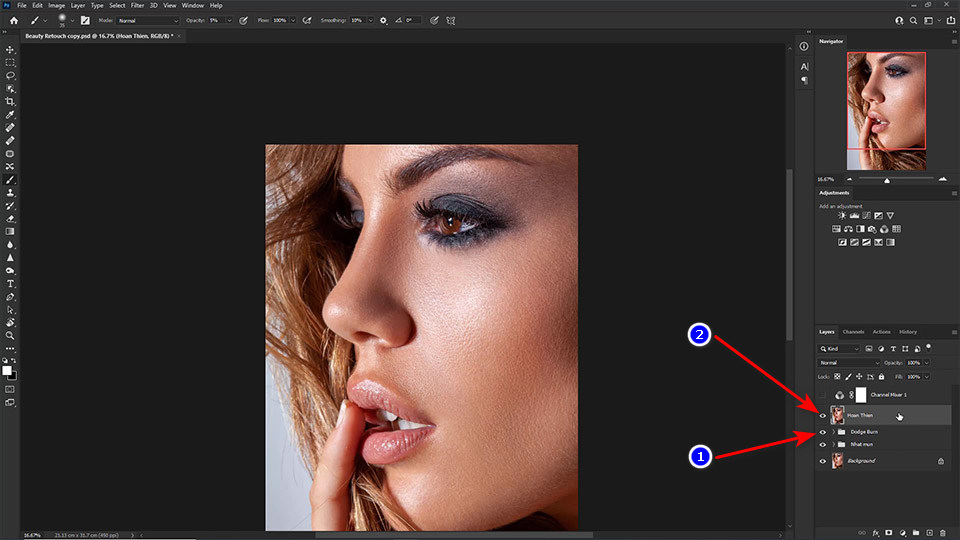
Clone group Dodge Burn (Ctrl+J), merge into 1 layer and rename to Complete.
Step 12: Duplicate the Finished object twice, rename it the same as step 3 and subtract 1 from the Gaussian Blur and High Pass values.
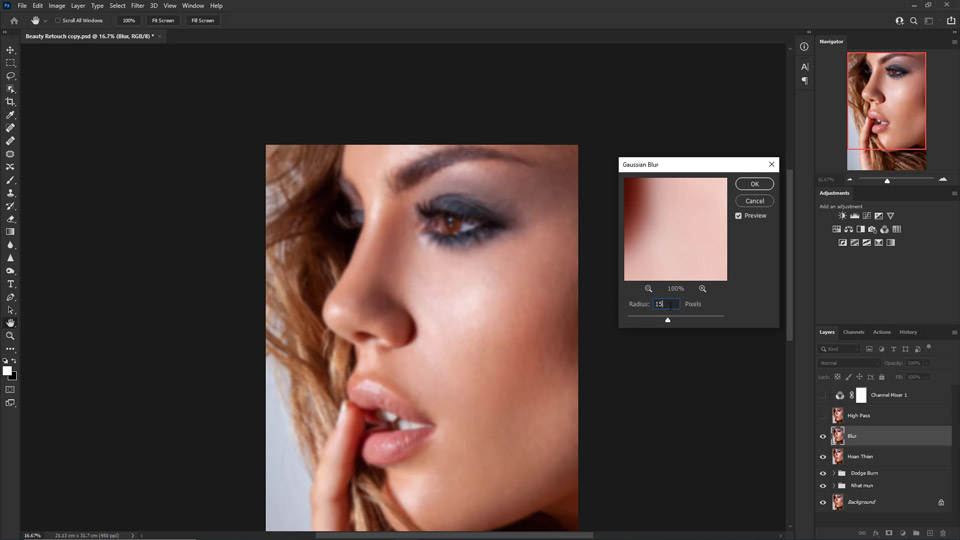
On the 2nd time Filter > Blur > Gaussian Blur to subtract 1 from an adjusted number.
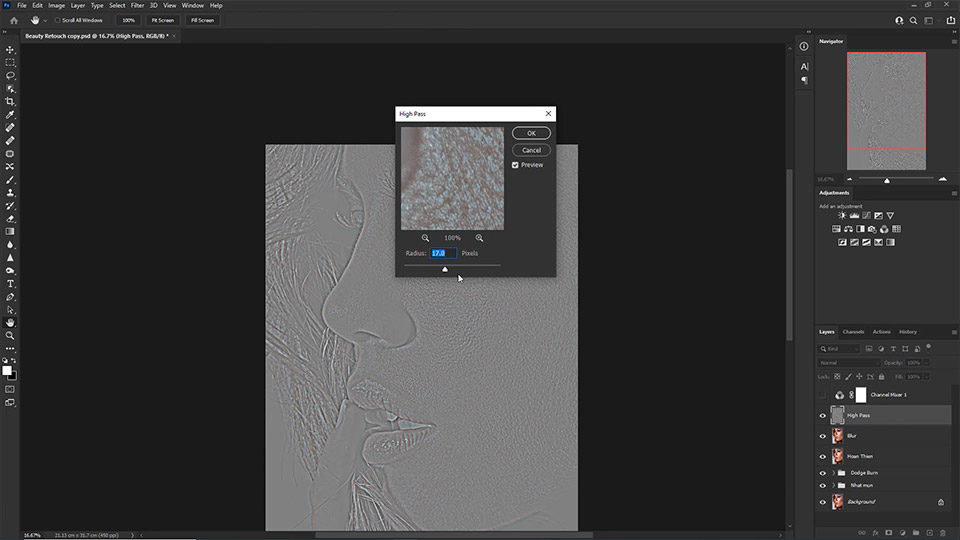
On the 2nd time Filter > Other > High Pass to subtract 1 from an adjusted number.
Step 13: Brightness & Contrast is similar to step 5
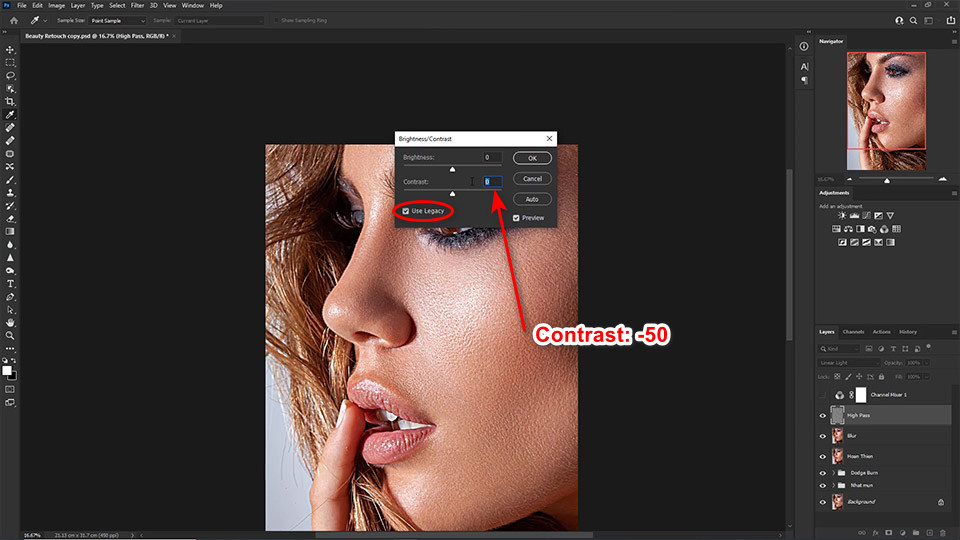
You adjust the light Contrast similar to step 5.
Step 14: Select the Blur object and use Lasso to draw the areas of the face that need to be smoother using Gaussian Blur
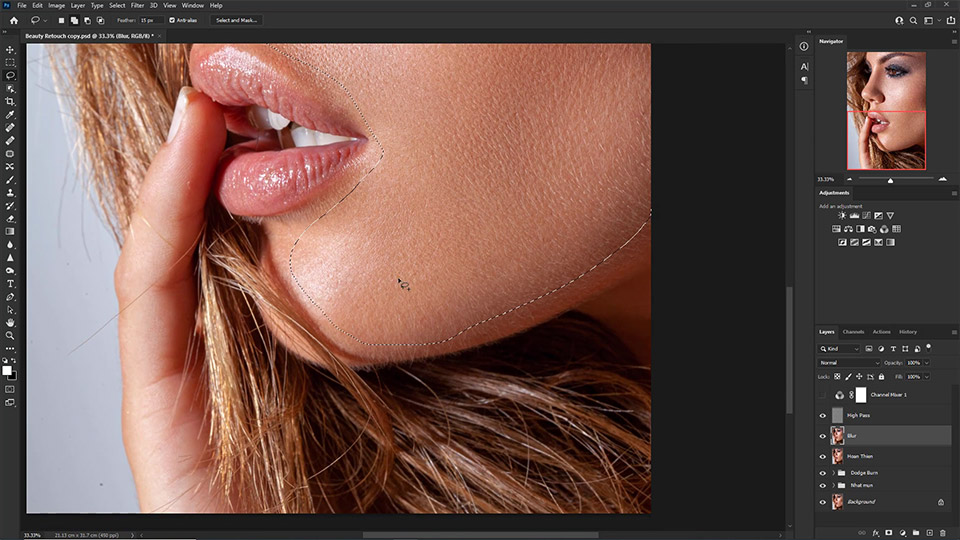
Use Lasso (L) In the Blur object, paint over areas of the face that need to be smoother.
Step 15: Create a group of 3 final objects and rename it Tinh Chinh
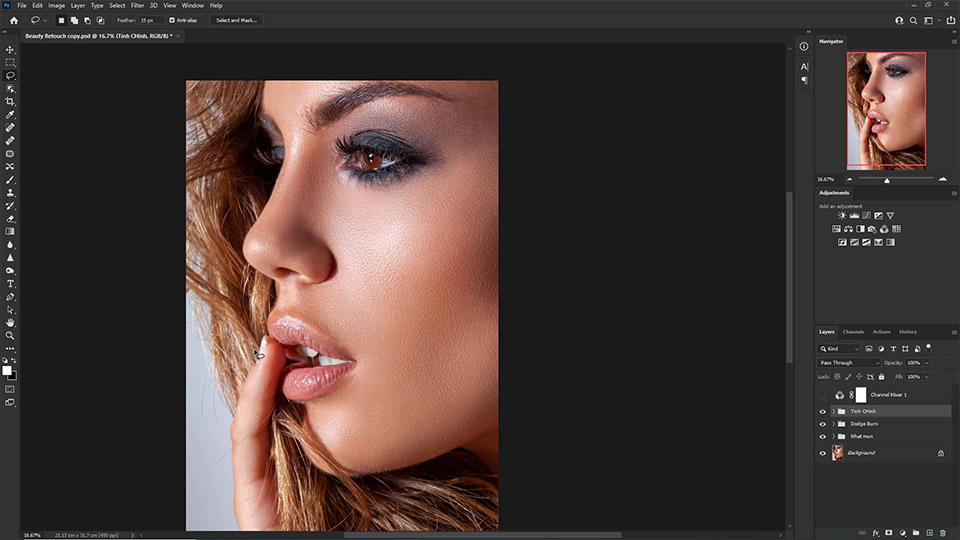
Create a group of the last 3 objects and then rename them to Tinh Chinh.
Step 16: Create a blank layer and use Brush to create light areas then adjust in Blending Options
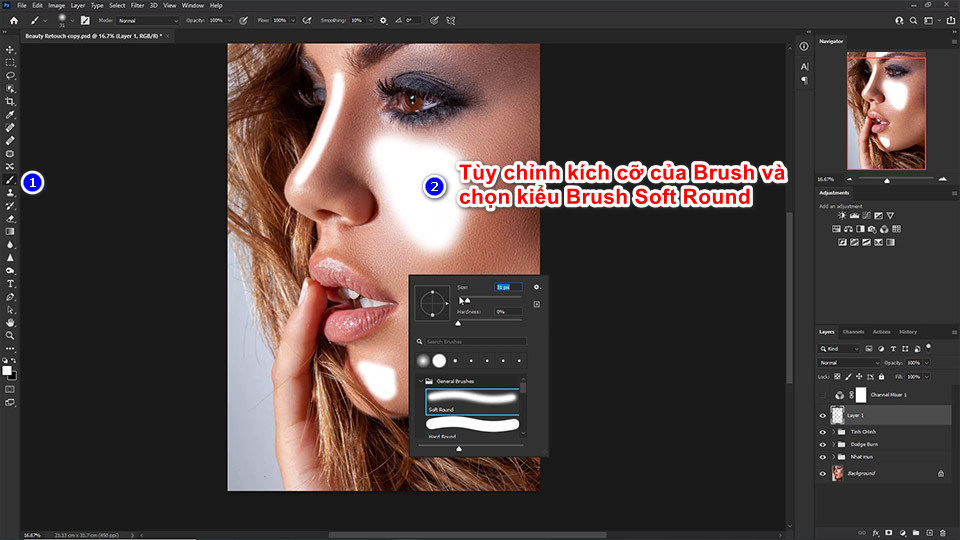
Create an empty layer and use a white Soft Round Brush to paint on the areas of the face that need to be brightened.
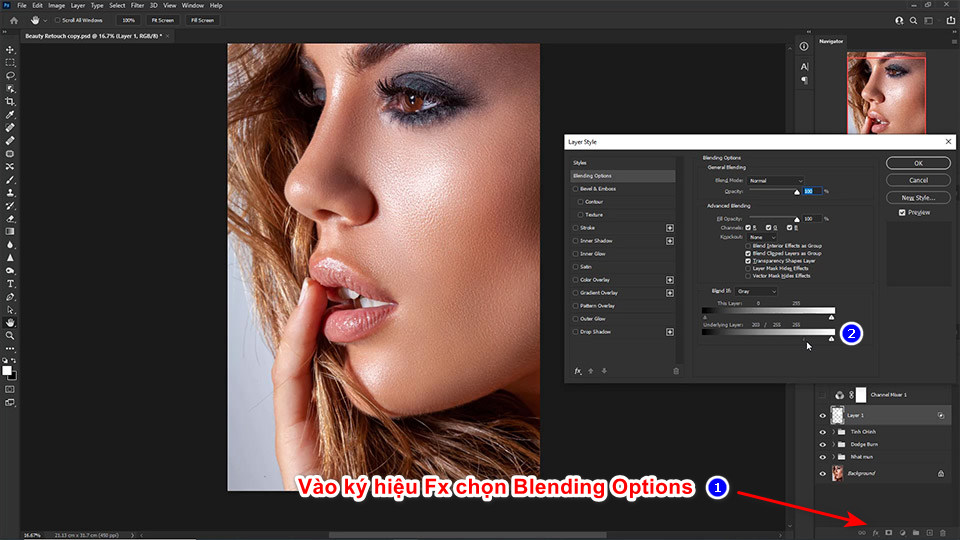
Step 17: Select an empty layer and reduce Saturation to negative number then create Curves and adjust 2 points to be darker -> clip to Hue/Saturation
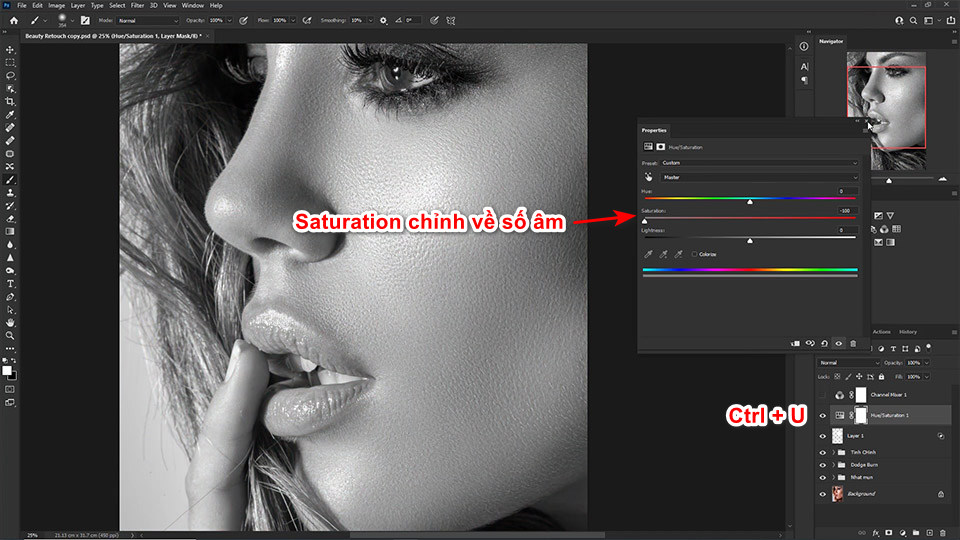
Select Image > Adjustment > Hue/Saturation (Ctrl + U) to reduce Saturation to negative numbers.
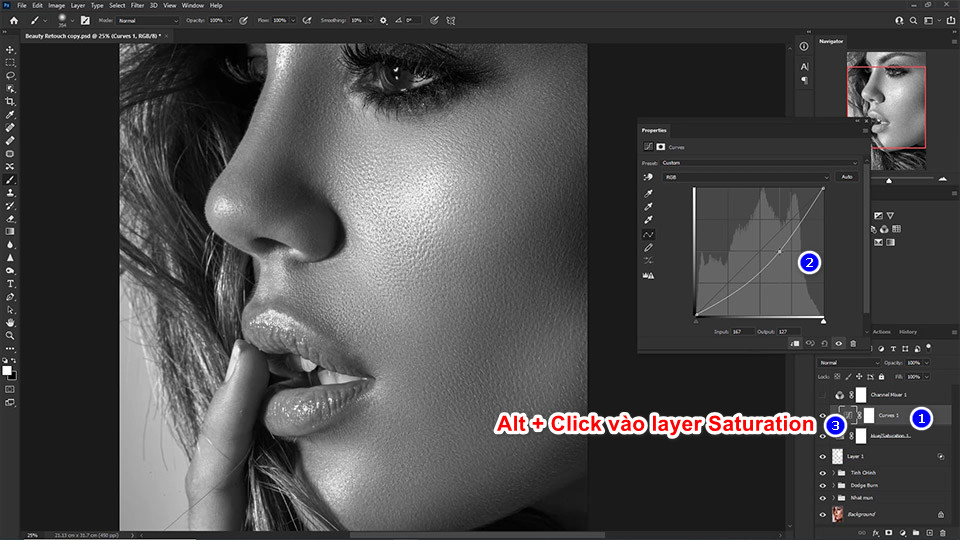
Enter Image > Adjustments > Curves (Ctrl + M) then create 2 adjustment points towards the darker side, hold Alt click on the layer Saturation to create Clipping Mask.
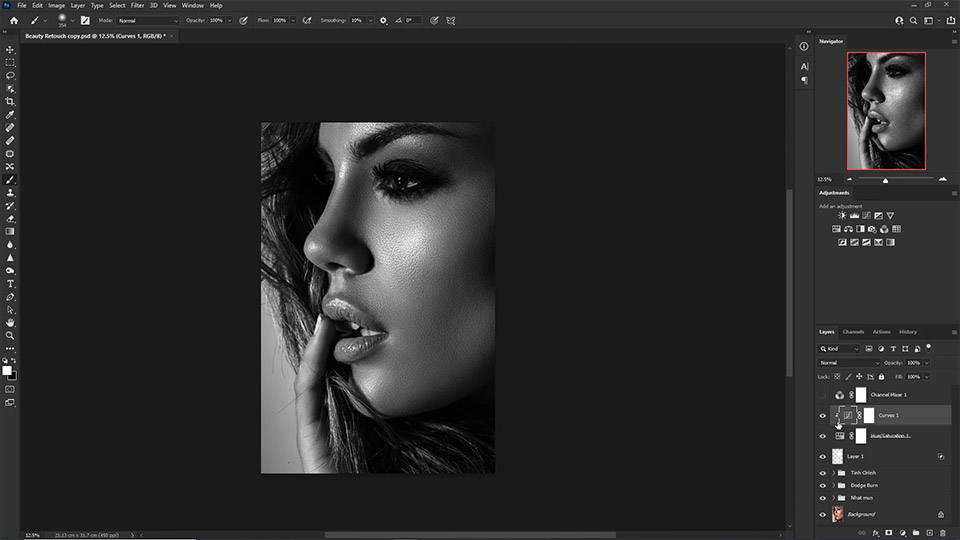
And here is the finished image. Good luck with your facial smoothing!
Detailed video tutorial on advanced skin smoothing in Photoshop
Conclude
- Advanced skin care requires patience and commitment on your part. Here are some tips to smooth your skin and improve the quality of your skin:
- Make sure to practice daily skin hygiene by washing your face thoroughly twice daily and using skin care products that are appropriate for your skin type.
- Use a layer of sunscreen with a high sun protection factor to protect your skin from the effects of harmful UV rays.
- Eat a healthy diet rich in vitamins and minerals to help provide essential nutrients to your skin.
- Don’t forget to drink enough water every day to keep your skin hydrated. Water helps cleanse your body from the inside and makes your skin brighter.
- Limit exposure to direct sunlight and use protective measures such as wearing hats, using sun umbrellas, and staying out of the sun during the hottest part of the day.
- Indulge in beauty treatments like exfoliation, steaming, and natural masks to help soften your skin.
- Make sure you get enough and regular sleep every night to give your skin time to repair and regenerate itself.
Remember, smoothing skin doesn't happen overnight. It takes patience and diligence in your daily skin care routine to achieve the best results.
If you would like to learn more, Contact us!


